Build an Instant Form
Last updated, December 2023

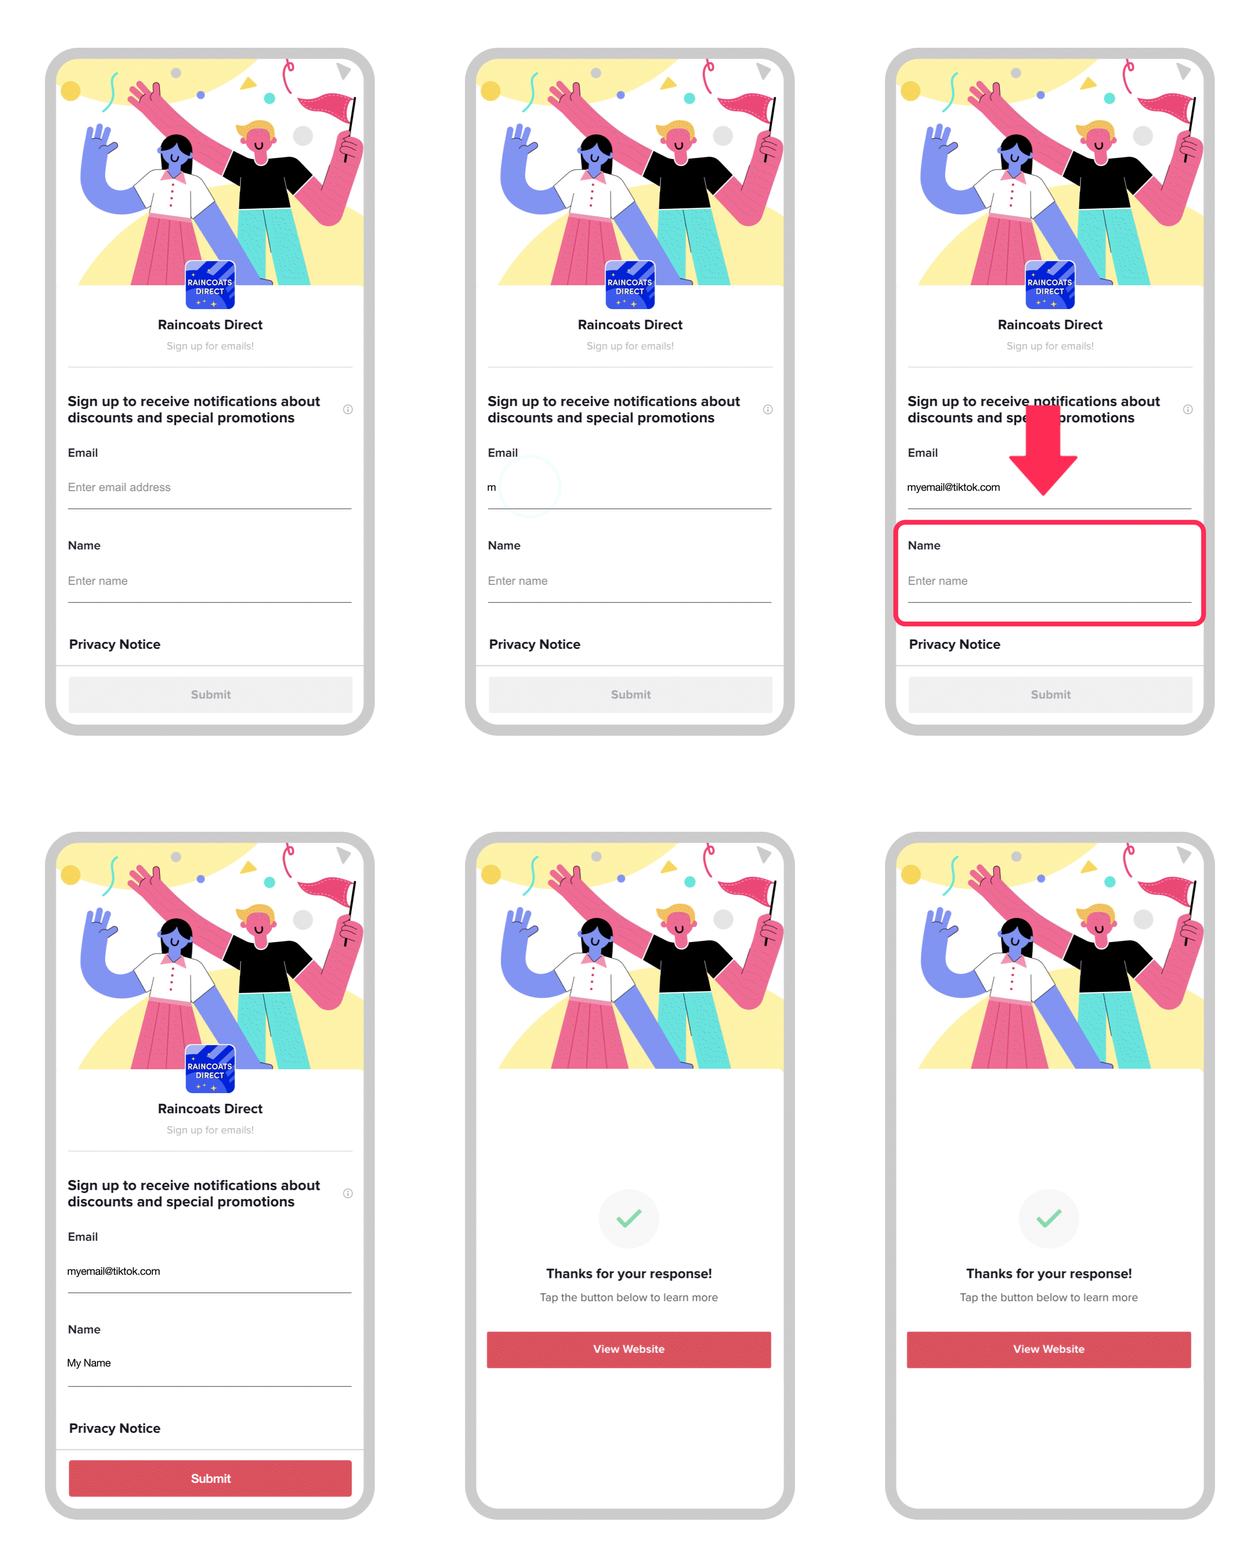
If you are looking to create a native experience for potential customers, our in-app instant form solution offers flexibility in lead capture and management. When someone clicks the CTA on your Lead Generation ad, it will pull up an Instant Form. The Instant Form allows customers to share their contact information, learn about your business, answer your questions, and schedule an appointment.


https://lf16-cognition-tos.ibytedtos.com/obj/cognition-sg-public/attachment_png81bfe62e966c85437392df27ecb6db7d.png

In this section, we'll cover how to:

  • ​Access the Instant Form Builder

  • ​Create a new Instant Form

  • ​Customize an Instant Form

  • ​Manage Instant Forms


To access the Instant Form builder

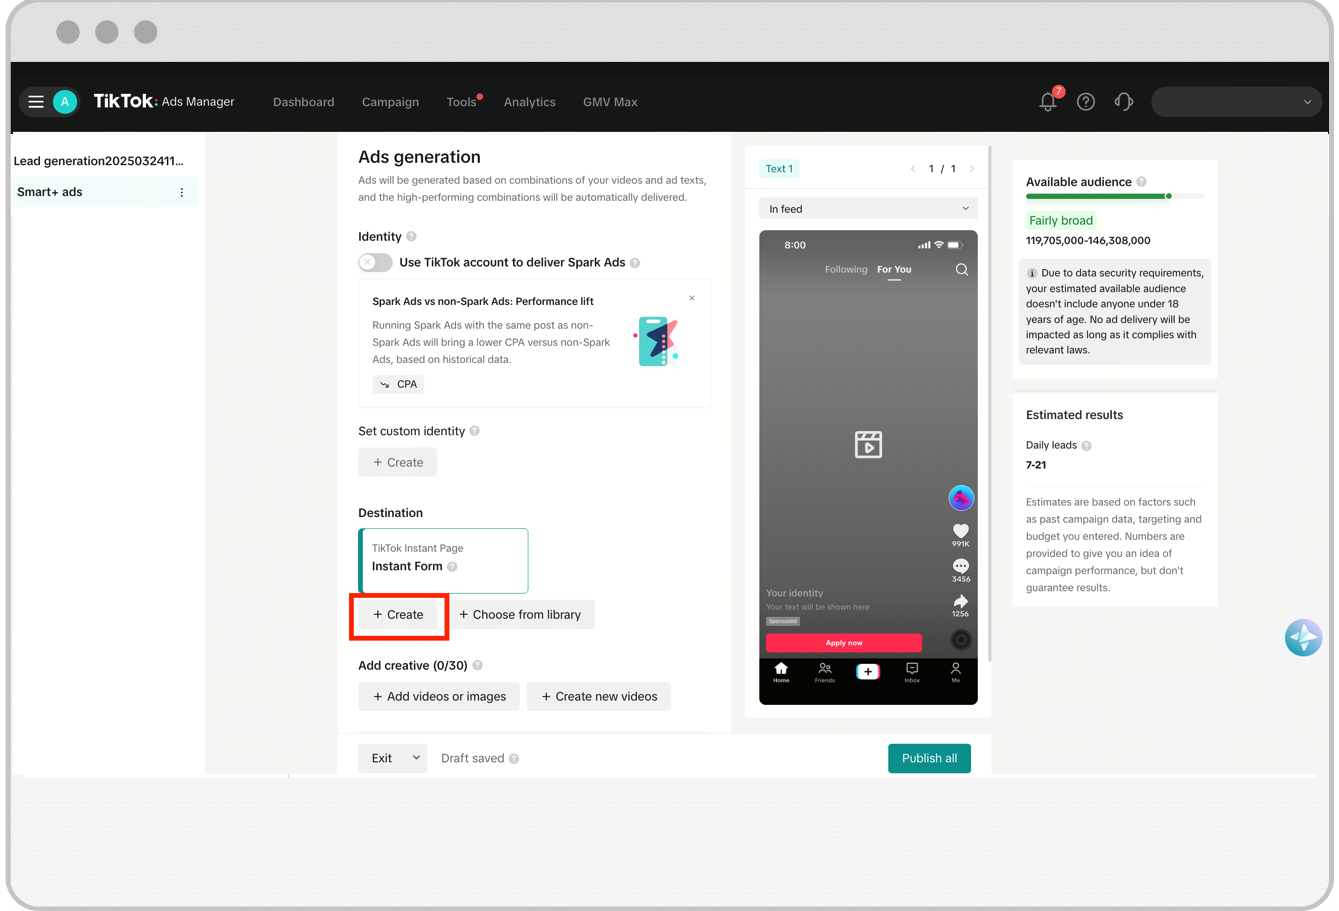
You can access the Instant Form builder at the ad level of an ad group that belongs to a campaign using the Lead Generation objective.

https://lf16-cognition-tos.ibytedtos.com/obj/cognition-sg-public/attachment_png02d4e7b0a47bb99d803a3c6e11930644.png

You can navigate there by

  • Creating a new Lead Generation campaign, ad group (with Instant Form as the Promotion type), and accessing the Instant Form module at the ad level.

  • Selecting an existing Lead Generation campaign, creating a new ad group with Instant Form as the Promotion type, and accessing the Instant Form module at the ad level.

  • Selecting an existing Lead Generation campaign, selecting an existing ad group (with Instant Form as the Promotion type), and accessing the Instant Form module at the ad level.

Once you have accessed the Instant Form module, you can pull up the Instant Form builder by

  • Clicking the Create button.

  • Hovering your mouse over an existing Instant Form and clicking Copy.

  • Hovering your mouse over an unfinished Instant Form and clicking Edit.


To create a new Instant Form

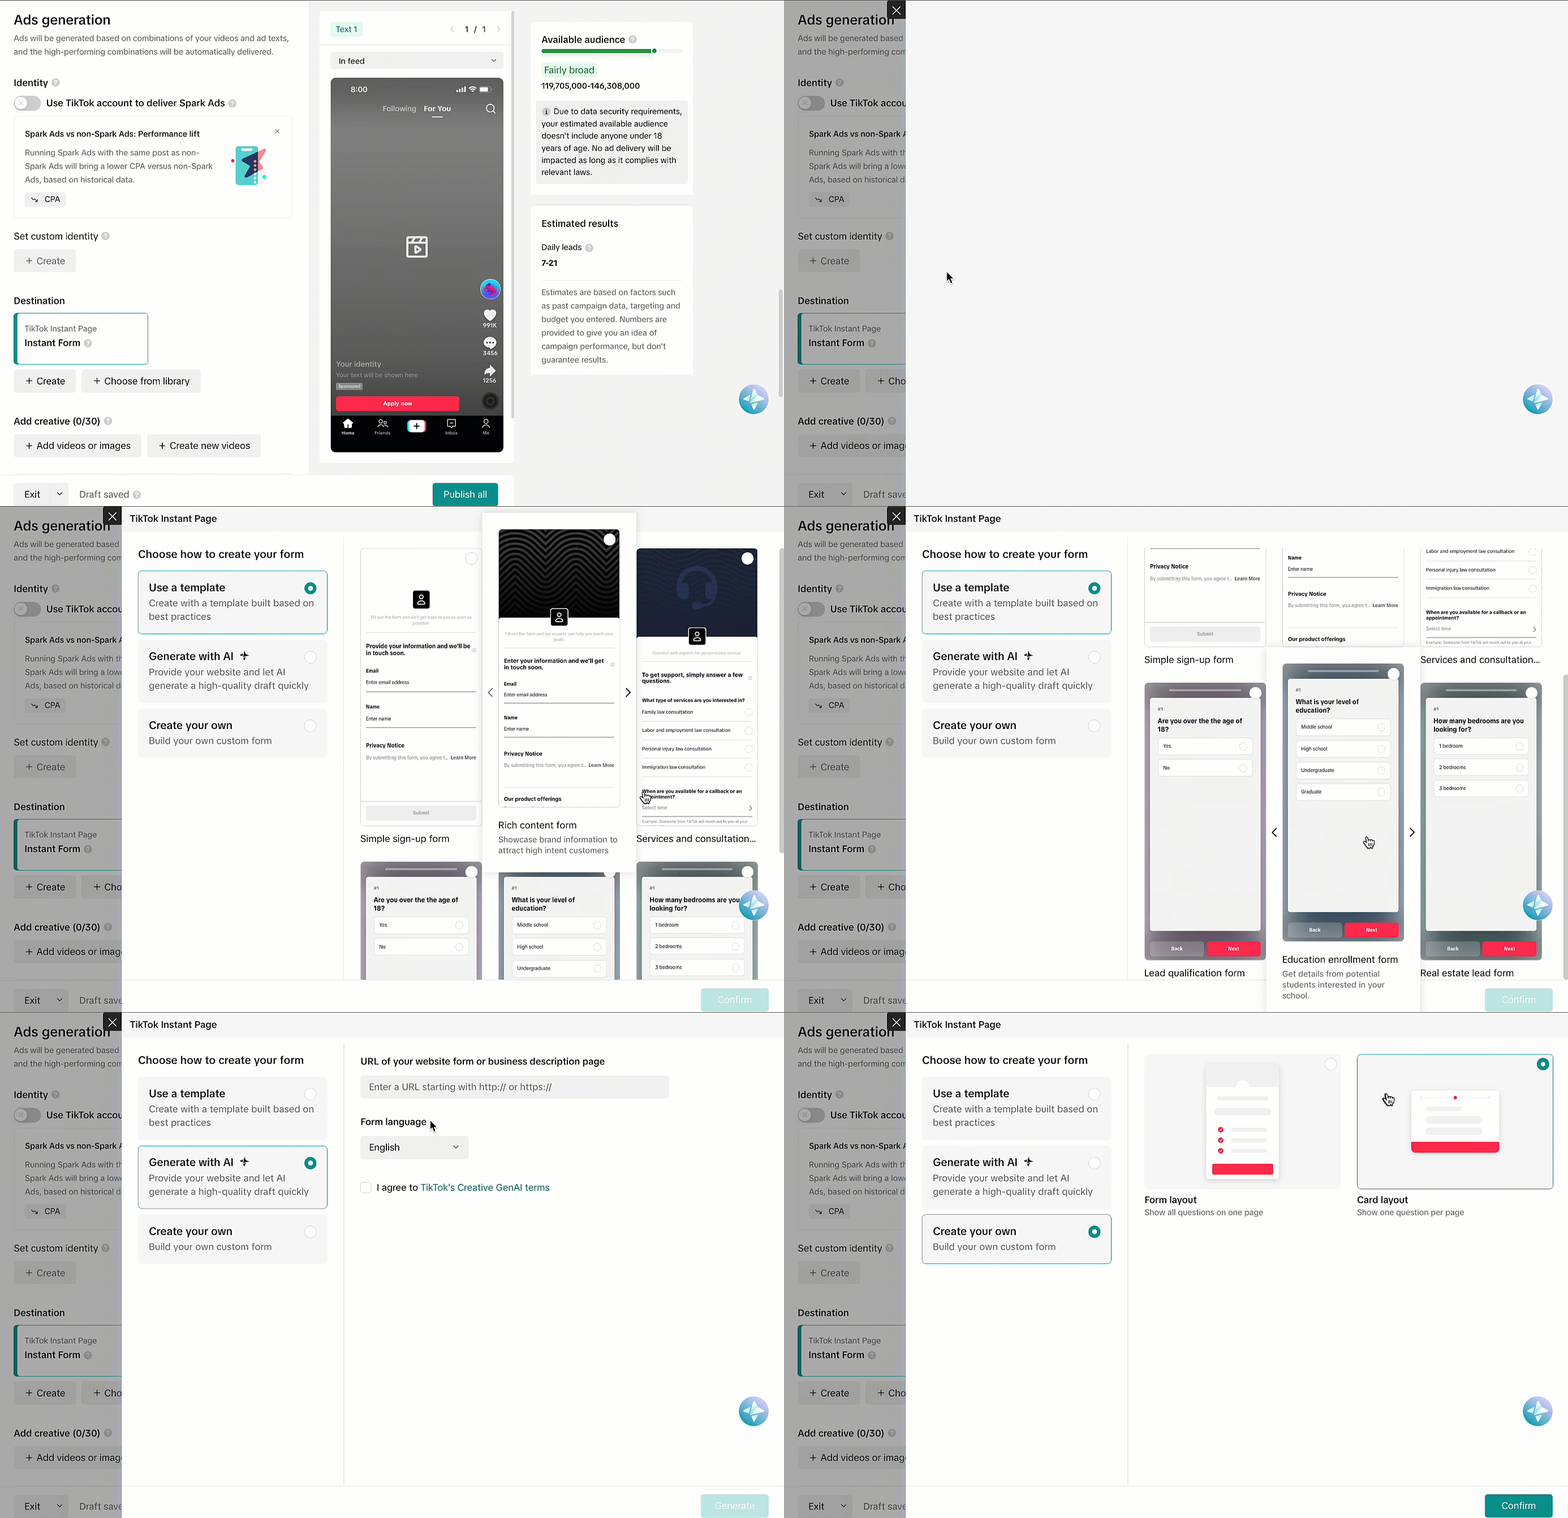
  1. ​Navigate to the Instant Form module and click Create.

  2. ​Select an Instant Form Template: choose an Advanced Form, Classic Form, or a Rich Content Form.

    • Note: An Advanced Form has two additional modules that Classic Form does not have, including the Brand Image & Form Style and Additional Image fields.

    • To learn more about the Rich Content Form template, refer to About the Rich Content Form template.

  3. ​After selecting a template, you will need to click Settings and choose the Form Language from the drop-down menu.

  4. ​Once you've selected a language, click Content to customize your form.


To customize an Instant Form

In this section, we will review all of the available ways you can customize an Instant Form. These options will be available if you are creating a new form, copying an existing one, or editing an unfinished form.

https://lf16-cognition-tos.ibytedtos.com/obj/cognition-sg-public/attachment_gif58861bdb9ce9a71f2480b48176e046f1.gif

From the Instant Form's Content tab, you will be able to customize the following sections.


Form Type

While setting up your instant form, you will have to decide between More Volume or Higher Intent form types. The type of form may impact the volume of leads and the cost per lead. The default instant form type option optimizes for More Volume.

  • ​More Volume is the simplest experience, where no additional review page is added for users prior to submitting the form.

    • ​It is more suitable for scenarios where you want people to submit the form quickly, thus allowing you to collect more number of leads.

    • ​If you're trying to build an audience list or looking to quickly pre-register people, then More Volume form type is suitable for your Lead Generation campaign.

  • Higher Intent uses an instant form with an additional review step and CAPTCHA to the form submission experience. As a result of the additional steps, users are able to review their information and verify they are human through an CAPTA activity before submitting your form.

    • ​It is more suitable for scenarios where you want to avoid incorrect submissions or to ensure submissions are from people verified from CAPTCHA.

    • ​People will need to review both custom and pre-filled questions that you will incorporate in your Instant Form. This added friction enables you to collect leads that are more likely to be interested in your product or service.


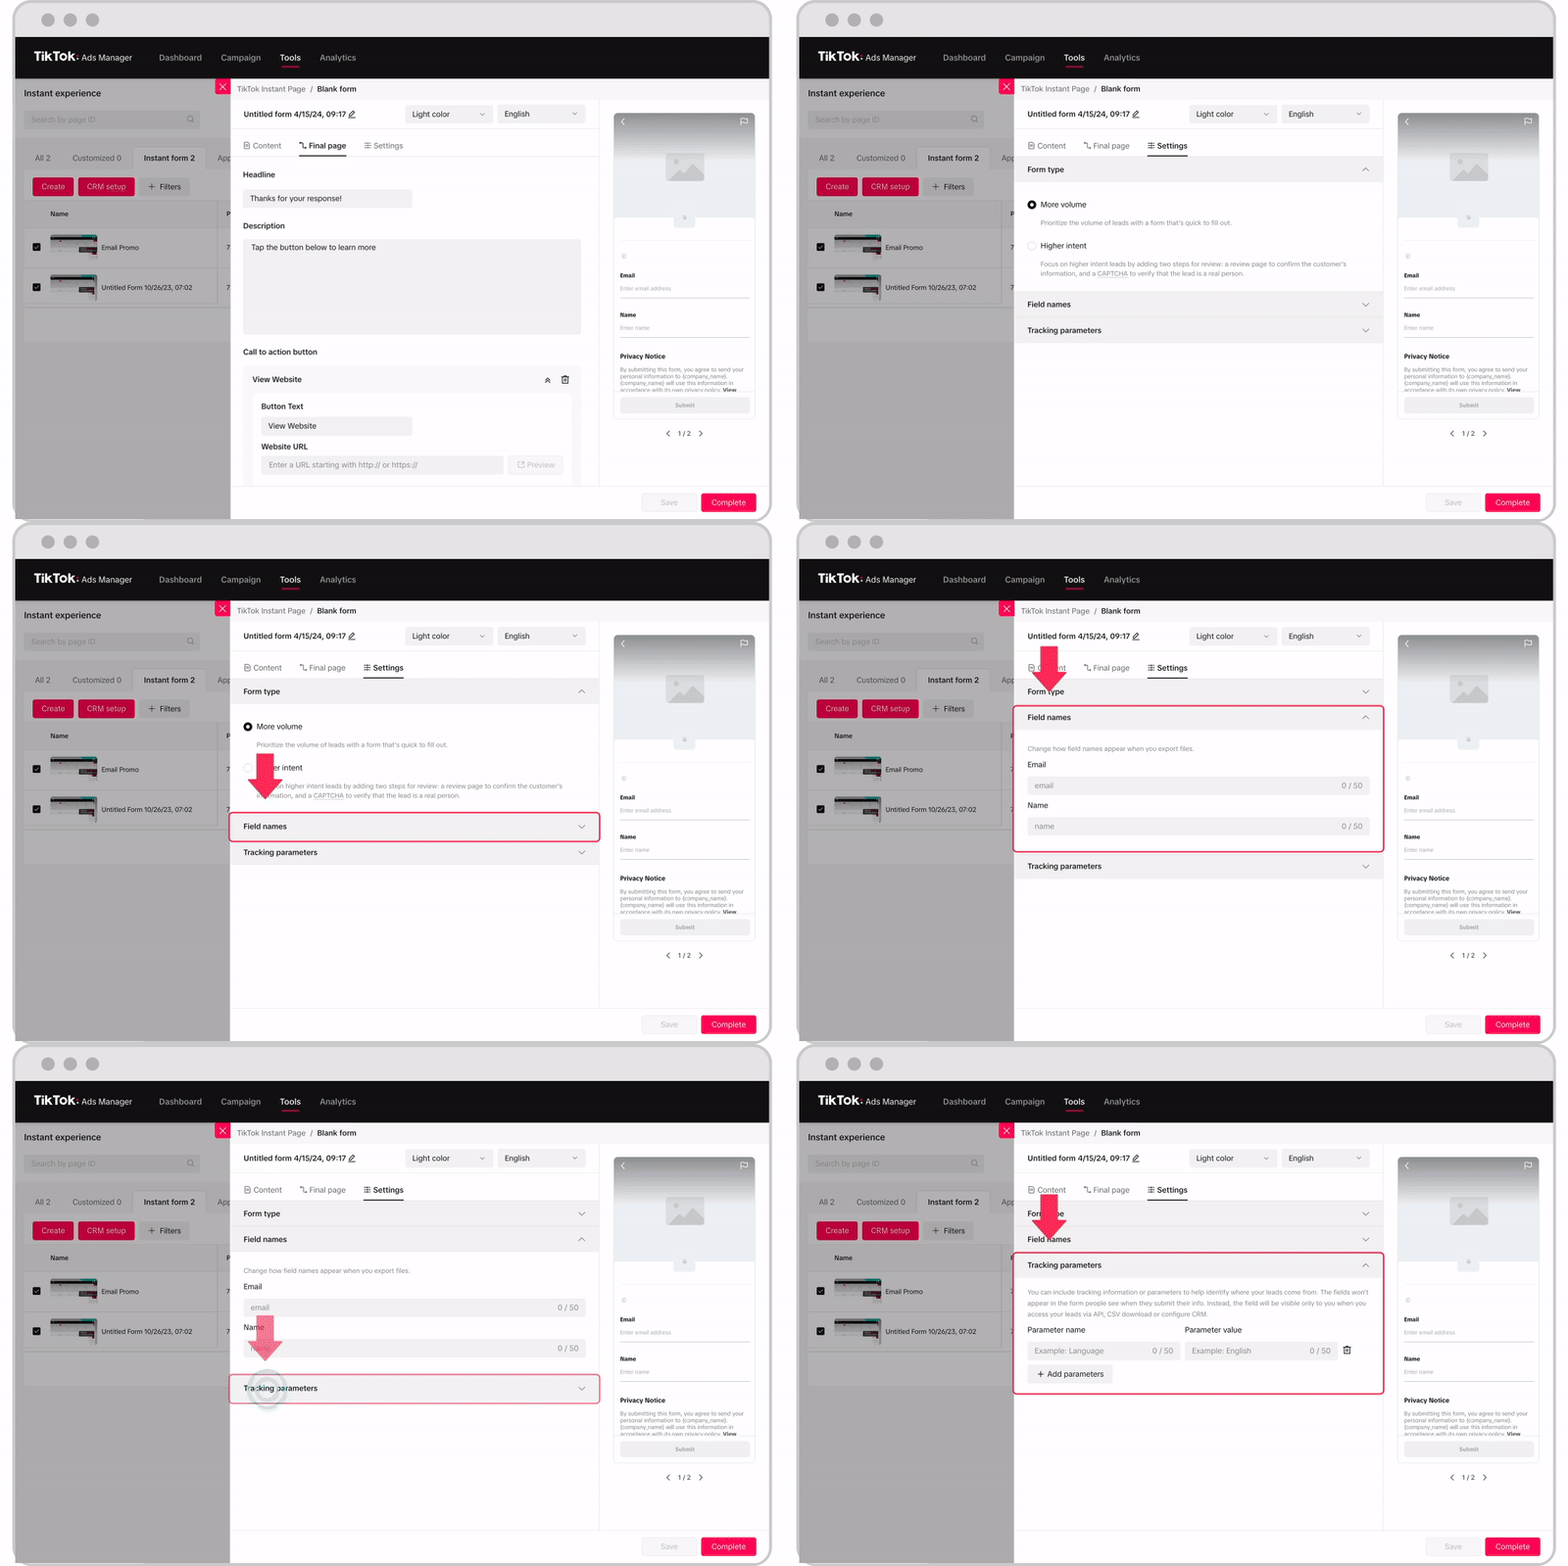
Tracking parameters

With Tracking parameters, advertisers will have the ability to include specific parameters that assist them in identifying the sources of their leads. Below are additional details about tracking parameters:

  • Tracking parameters will be available in the Settings section.

  • Advertisers can set the Parameter name and Parameter value.

  • Tracking parameters will be hidden fields that are not visible to users who fill out the instant form. They can only be accessed by the advertiser to track their lead campaign.


Banner

The Banner lets you display your brand or product on the top of your Instant Form using an image or carousel.


To create/edit a Banner:

1. ​Choose a banner type Image or Carousel.

2. Click + to upload images from a local file.

  • ​Supported Image format: JPG, JPEG, PNG

  • ​File Size: Up to 2MB

3. This module is only supported by Advanced Form and Rich Content Form.


Brand Image & Form Style

  • ​Select a Brand Image to display as your form's header image and choose a form style: Light Color Scheme, Dark Color Scheme, or Smart Color Scheme.

  • ​This is a required selection.

  • ​This module is only supported by Advanced Form and Rich Content Form.


Introduction

  • ​This module will allow you to share some information about your business and share some information about the purpose of your form, use this field to upload a Logo, enter your Displayed Name, write a Headline, and add a Promotion Slogan (this selection is optional).

  • ​This is an optional field and can be toggled on and off.

  • ​This module is supported by Classic, Advanced, and Rich Content Forms.


Question

  • ​This module will allow you to write a Purpose Statement which is used to explain the purpose of the form, create Custom Questions to ask questions that are relevant to your business situation and ask people to share Personal Information which you can use to contact them later. The Questions module supports the following selections:

  • ​Custom Question categories include:

    • Short Answer: Ask people to write a short response to a custom question.

    • ​Multiple Choice: Ask people to select an answer from a bank of up to 10 responses.

    • Appointment Scheduling: Allow people to schedule an appointment for a follow up.

    • Conditional Answer: Options for the next question are dynamically shown based on users' response to previous question.

    • ​Note:

      • ​You can add up to 10 custom questions.

      • To add another question click Add Categories

      • You can select the order of your questions but Multiple Choice questions will be displayed before Short Answer and Appoint Scheduling questions.

      • Custom Questions must conform to our Lead Ads terms of use and Ad Creative Policies.

      • ​Appointments can only be scheduled between 7:00 AM and 10:00 PM.

      • For more information about Conditional Answer, please refer to Conditional Answer section below.

  • ​Personal Information question categories include:

    • ​Phone Number

    • ​Email

    • ​Address

    • ​Country

    • ​Province/State

    • ​City

    • ​Name

    • ​First Name

    • ​Last Name

    • ​Gender

    • ​Note:

      • Whenever possible, the Personal information will be pre-filled in with the information of logged-in TikTok users.

      • You can use all the Personal Information question categories in a single form.

  • ​You can use all the Personal Information question categories in a single form.

  • ​You can use all the Personal Information question categories in a single form.

  • ​This is a required selection.

  • ​This module is supported by both Advanced, Classic, and Rich Content Forms.

Note: To learn more about prohibited question types, refer to TikTok Advertising Policies - Ad Creatives and Landing Page: Prohibited Content.

Custom field names

When you downloads leads or sync leads to your CRM, TikTok Ads Manager automatically generates field names in the file. However, your existing internal system or CRM may use different field names. As a result, you will have to update the field names manually to match the definitions in their internal system or CRM.


With the introduction of Custom field names, you will have the ability to adjust the field names to match the definitions in your internal system. This capability will be supported for both Classic and Advanced Forms. To use Custom field names, follow the steps below:

  • Set up Questions (Both Custom and Personal questions are supported).

  • Expand the Customize Field Names section and set custom names corresponding to the questions or choices entered in the previous step.

  • Additionally, you can customize the Consent field in the Privacy section by adding a Customize field name.


Conditional Answer

Conditional Answer is a type of Custom Questions. It allows advertisers to dynamically show options for question based on response to previous question. We also provide features that enable advertisers to upload questions and corresponding answers via CSV template.


Let's say you are an auto manufacturer and your brand has many dealerships across the country. You want users to choose the right dealer they want to visit. So the first question in your Conditional Answer set might be "Which state do you live in" and the second question might be "Which city do you live in", and lastly, "Which dealer do you prefer?”


If the answer to the first question is "California," then only cities in California will be served as options in second question. The same applies to the third question: only dealers that are in the city chosen by user will show up as options.


If you choose Conditional Answer, you will be asked to download a template first.


Note:

  • The second row is left blank deliberately. Please DO NOT input any values in the second row.

  • Row 1 of each column is about questions you want to ask; you can add a max of 5 questions, such as Column A to E.

  • From Row 3 and onwards, please provide options for each question. Make sure they are mapped correctly.


After you finish editing this template, upload it back by clicking Upload CSV File. Choose the file you just edited.


If uploaded successfully, you will see what you uploaded automatically becomes a series of questions and options.


If uploading failed, you will receive an error message. Please update your CSV file accordingly and try to upload it again.


There are a few things to bear in mind about conditional answers:

  • All users who click on this form will see the same questions in the same order, different from Logic Setting below.

  • Answers that people can choose will be shown dynamically based on response to last question. The questions will not change.


Qualifying question

The qualifying question option helps you measure and lift lead quality. It's a filter for a multiple choice question that lets you assign options with labels of Preferred or Not Preferred to each lead.


For more information on using a qualifying question, refer to About the qualifying question option.


Logic Setting

When you add Custom Questions to your Instant Form, you can enable the Logic Setting feature to ask a series of conditional questions. This means the questions someone sees on your Instant Form will depend on how they answered the previous question.


Imagine you're giving away a gift to people who sign up for your newsletter via your Instant Form. And people can either pick up their gift at one of your stores or have it delivered to their homes. The first question you should ask is, "How would you like to receive your gift? Pick up or Delivery."


If they choose "Pick up," the next question you should ask is "Select the store closest to you." And if they select "Delivery," the next question you should ask is "Enter your shipping address."


If you want to enable Logic Setting on your Instant Form, here are some things to keep in mind:

  • ​You can only apply Logic Setting to Custom Questions.

  • ​Only future questions change based on previous responses.

  • ​You must add all of the Custom Questions to your Instant Form before enabling Logic Setting.

  • ​In most cases, we recommend asking Multiple Choice questions.


To enable Logic Settings on your Instant Form:

  1. Enter all the Custom Questions on your Instant Form and their corresponding answers. Then arrange them in order.

  2. Turn on the Logic Setting toggle.

  3. For each question, click the Pencil icon.

  4. For each answer, use the drop-down menu to determine what happens when this answer is selected. You can:

    • ​Choose the next question you want to display.

    • ​Complete the custom question module, which will take people directly to your form's next section.

5. Click Complete.


Consider the following when mapping out your Custom Questions' Logic Setting:

  • ​You must enter a Logic Setting for each question's answer.

  • ​Logic Setting is applied to all Custom Questions.

  • ​If you want to ask everyone the same question before you start asking conditional questions, you should map each answer to the same question number. For example, if you want everyone to answer the first two questions, you must map all of Question 1's answers to Question 2.


Privacy

  • In this module, you will need to list your Company Name and enter a Link URL to your company's privacy policy on your landing page or website.

  • There is an additional Custom Disclaimer which can be toggled on and off. This will allow you to add additional Terms and Condition to the default TikTok privacy policy. If you opt to use a Custom Disclaimer, you add additional "required" or "optional" Disclaimers that people must or opt to consent to. For example, "I have read the terms and conditions", "I certify that I am over 18 years old and reside within the EU.", or an optional one "I am willing to receive marketing emails from XYZ company".

  • For required consents, users have to give their consent in order to submit the form.

  • To add a consent button to your form, click +Add Consent. If you want to set the Consent as Optional, check the Optional box.

  • The Privacy Policy module is a required selection, however, the Custom Disclaimer module is not.

    • Note: Some markets may require a Custom Disclaimer and additional consents when collecting personal information.


Review Screen

Note: This is only available if you have selected Higher Intent as your Form Type.

  • ​This module will be automatically generated if you have selected Higher Intent as your Form Type. There are no fields that you will need to customize, as the module will be automatically generated within the form and give people a chance review the information they entered before they submit the form.

  • ​This is only a required module if you are using a Higher Intent Form Type.

  • ​This module is supported by both Advanced, Classic, and Rich Content Forms.


Thank You Screen

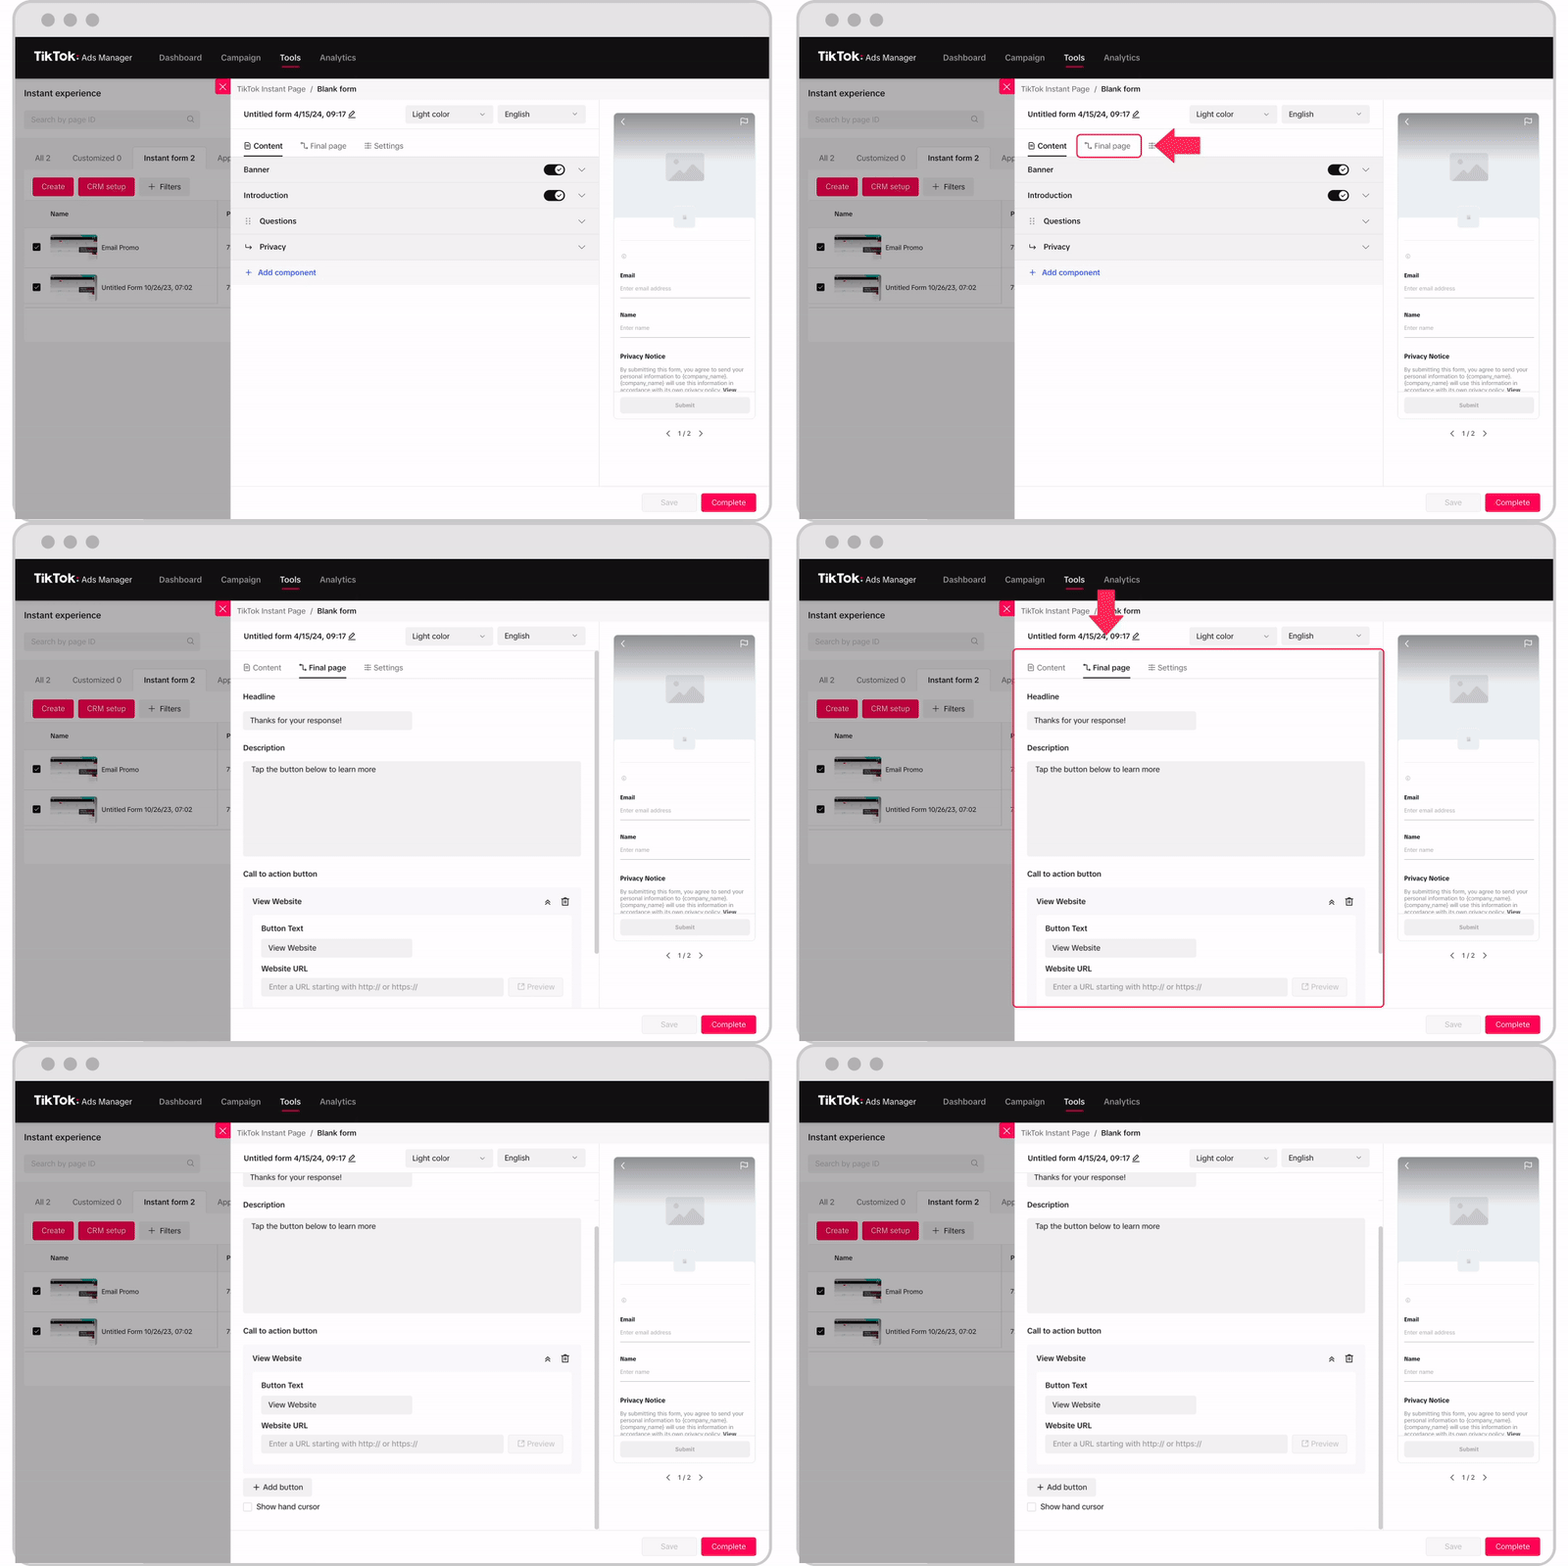
  • ​This section of your form will display after people have submitted their information. You will be able to add a Headline and a Description. Additionally, you can add your Call to Action Button, which will allow you to drive traffic to your website and/or an app install page. Just enter your Button Text and your Website URL or enter your Button Text and your App Store and Google Play URLs.

    • ​Note: The Advance Form supports both a View Website and an Install App Call to Action Buttons. Both a View Website and Install App buttons can be displayed together on an Advanced Form or individually, while the Classic Form only supports a single View Website CTA button.

  • ​This is a required selection.

  • ​This module is supported by both Advanced, Classic, and Rich Content Forms.


Customize

The Customize component lets you showcase your product or services at the bottom of your Instant Form. It can be used to help provide additional context or information about your business, brand, or products. It's not required and is only supported by the Advanced Form and Rich Content Form.


To create/edit an Image:

  1. ​Click + upload an image from a local file.

  • ​Supported Image format: JPG, JPEG, PNG

  • ​File Size: Up to 2MB


To create/edit a Carousel:

The Carousel component lets you highlight a coherent message using slideshow of up to 5 images. Adopt Carousel with images specific to the products, ideally display appealing showcases or present products in each category:

  1. ​Click Upload and select between 2 to 5 images.

  2. ​Crop to size and click Confirm.

  3. ​Arrange the order in which the carousel's images cards appear by dragging them to the desired position.

    • ​Supported Image format: JPG, JPEG, PNG

    • File Size: Up to 2MB


To create/edit Text

The Text component lets you insert a text box in your Instant Form:

  1. ​Write your copy in the Text Content field.

  2. ​Use the Text Style options to format your text block.

  3. ​Use the Text Margin options to determine how much space you want at the top or the bottom of your text block.


Additional Image

  • ​This module allows you to Upload an image that will be displayed at the bottom of each of your form's pages. It can be used to help provide additional context or information about your business, brand, or products. It's not required and can be toggled on and off.

  • ​This is not a required selection.

  • ​This module is only supported by the Advanced Form and Rich Content Form.


Mobile Preview

While you're customizing your form, The mobile preview panel will help you review how your form will look on TikTok. To switch from one page to another, click the < > buttons.


Save and Complete

While you are customizing your form, you may wish to save your progress and come back to complete your form later. To do this simply click Save. This will allow you to return to your form by accessing the Instant Form module at the ad level.


When you are ready to finalize your Instant Form, click Complete and you will find it in your Instant Form module. To use a completed form in your ad, simply click the button next to the form's name, and it will be attached to your ad.


Setup CRM connection directly from the instant form

You will be able to complete the CRM setup for the instant form while setting up the campaign. The option to Connect to CRM will be visible as soon as you finish creating the instant form during the final Ad setup process. With this capability, you can initiate instant form integration directly as part of setting up the ad campaign, without having to navigate to the Instant Page section.


Updating an Instant Form

You can edit the name of an Instant Form or replace an Instant Form that has already been attached to a campaign. To learn more, refer to Update Instant Forms.

Content